Venture Connect OverView
Venture Connect is a member portal for Venture Christian Church attendees which provides a myriad of useful functionality that can help you connect in more meaningful ways with the Venture Community. In order to take advantage of Venture Connect you need to have an account that requires a username and password.
Some of the benefits of having an account include:
- If you have an account that you can log in to first, then any event or class registration forms you’re attempting to complete will be simplified as the system auto-fills any relevant contact information directly from your profile.
- An account is required for making an online payment for events registration
- If you have children, and an up-to-date family profile, children’s checkin for weekend programs are a breeze as most of the necessary information can be extracted directly from your account.
- Church staff can easily contact you using your profiles contact details if there is an emergency situation when your kids are in class.
- Logging in to your account prior to volunteering simplifies the process by pre-identifying you as you submit an expression of interest forms.
- You can maintain your personal profile and household information, ensuring contact details are correct and up-to-date should any Ministries or your group leaders need to contact you
- If you’re a group leader, you have the ability to take group attendance and to update your groups profile (meeting locations and times) directly from your account profile.
- With an account, you can view the results of any assessments (such as DISC) you’ve taken with Venture.

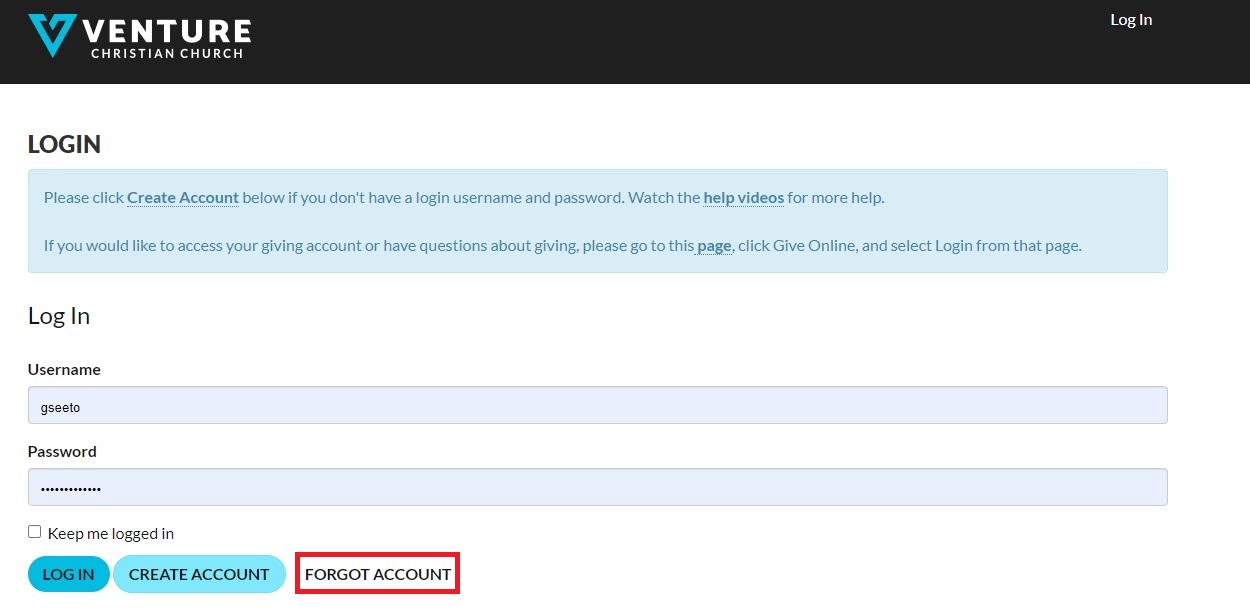
The login page for Venture Connect. Your gateway to all the benefits listed above.
As you can see, there are three scenarios:
Logging In - If you know your username/password you can log into your account directly
Forgot Account - If you cannot remember our password or are unsure you have an account, this process can assist you in password recovery.
Detailed steps for each respective scenario is shown below.
Logging In
To log in to your account:
- Enter your username
- Enter your password
- Click on the “Login” button
- And you should be able to access your account.
For the more visually inclined, a video tutorial is available.
Login to Account
A supplemental video tutorial on logging in to your account:
Forgot Account
If you’ve forgotten the account you have at Venture or aren’t sure you have an account, the best first step is to see if you have an account.
- Click on the "Forgot Account" link.
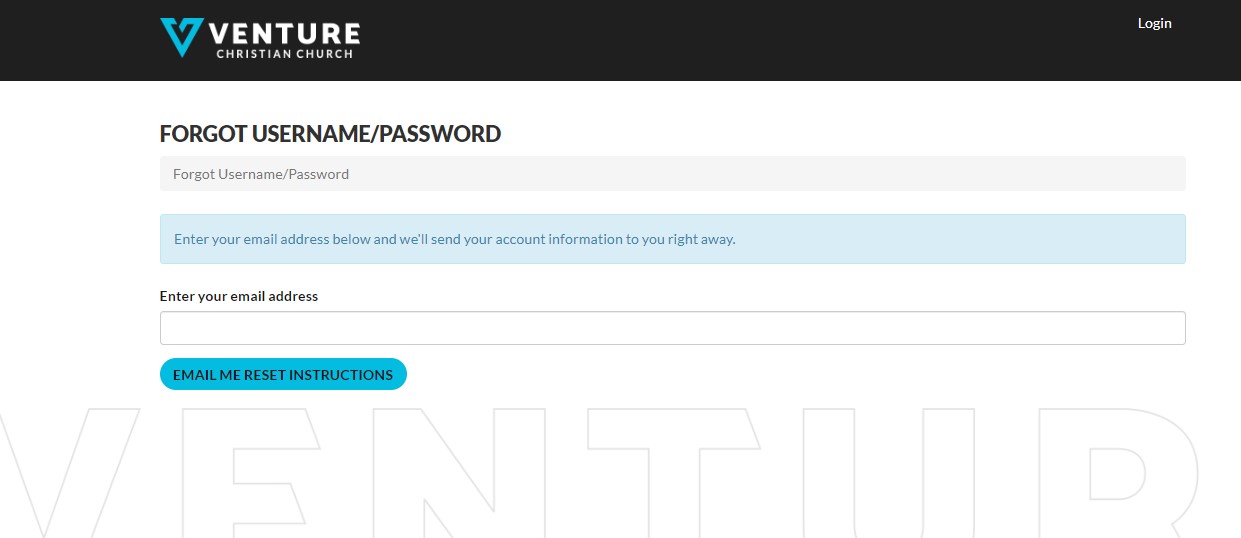
- You’ll be prompted to enter an email address in order for reset instructions to be emailed to you. At this point, enter the email address that you think you’ve most likely used in any previous dealings with Venture church. Then click on the “Email me reset instructions”.
-
You should then see the following confirmation page:

- Go to the email you listed and look for an email from Venture. If you don’t see an email, check your spam folder in case it was placed there. Otherwise, the email should look like this:
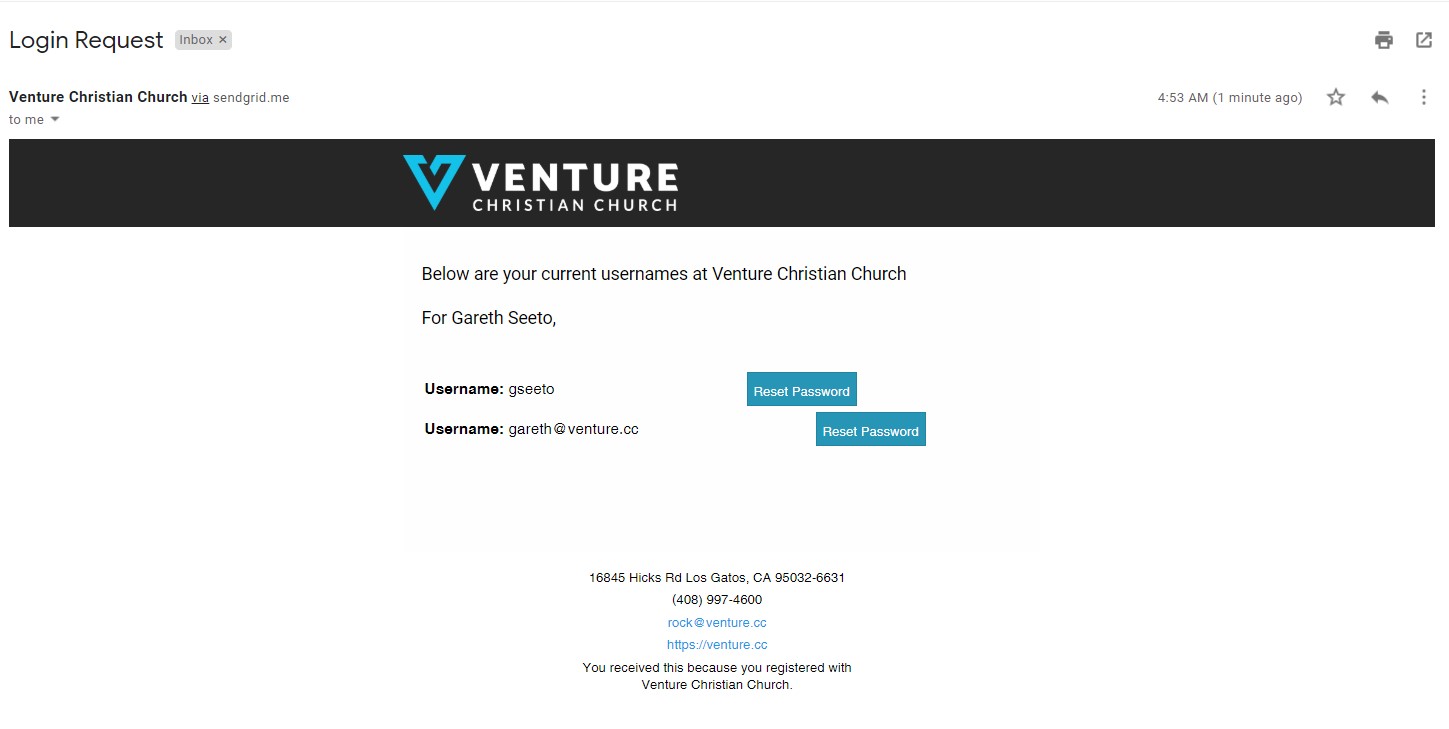
- Click on the “reset password” link in the email that was received.
- The following page is displayed, allowing you to reset your password.

- Enter your new password, confirm, and click on “change password”. You should see the following:
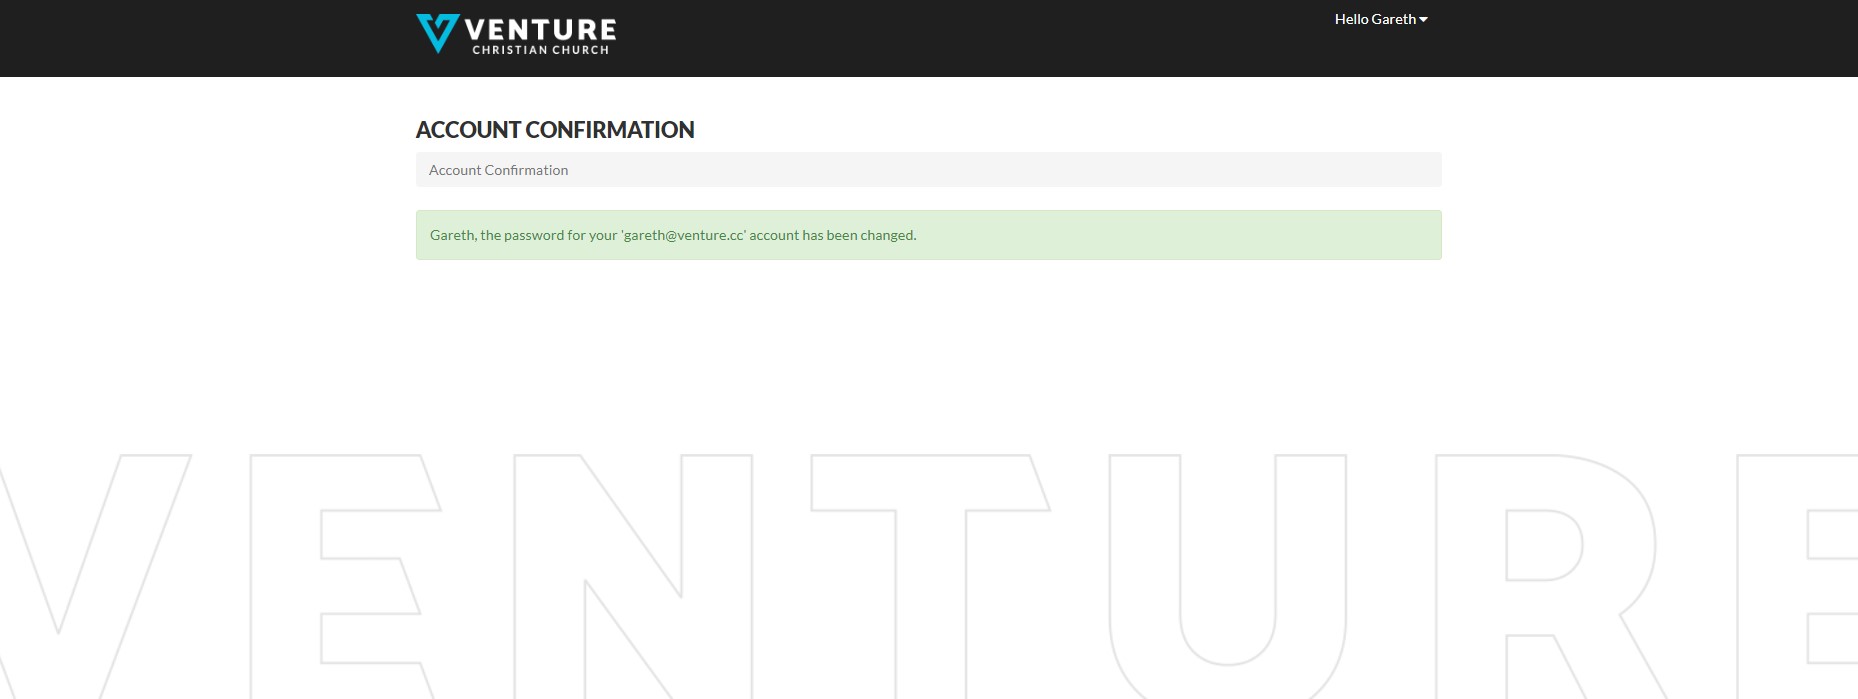
- Return to the login page from step 1 and enter the username specified in the email you were sent, and the password you just created.
- Then click on “Login”.
You should now be able to access your account.
A video tutorial of this is available here:
Venture Connect - Forgot Account
Create an Account
If you’re pretty sure you don’t have an account, then follow these steps:
- Click on the "Create New Account" button.
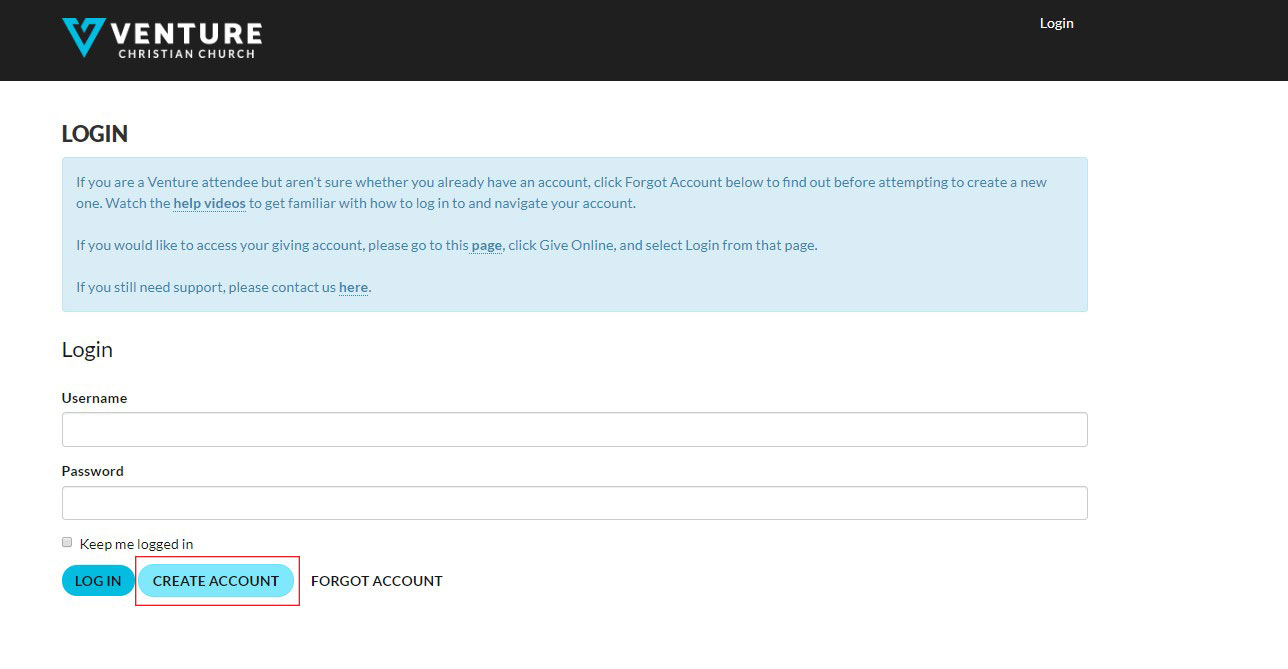
- Fill in the details for Account Registration.
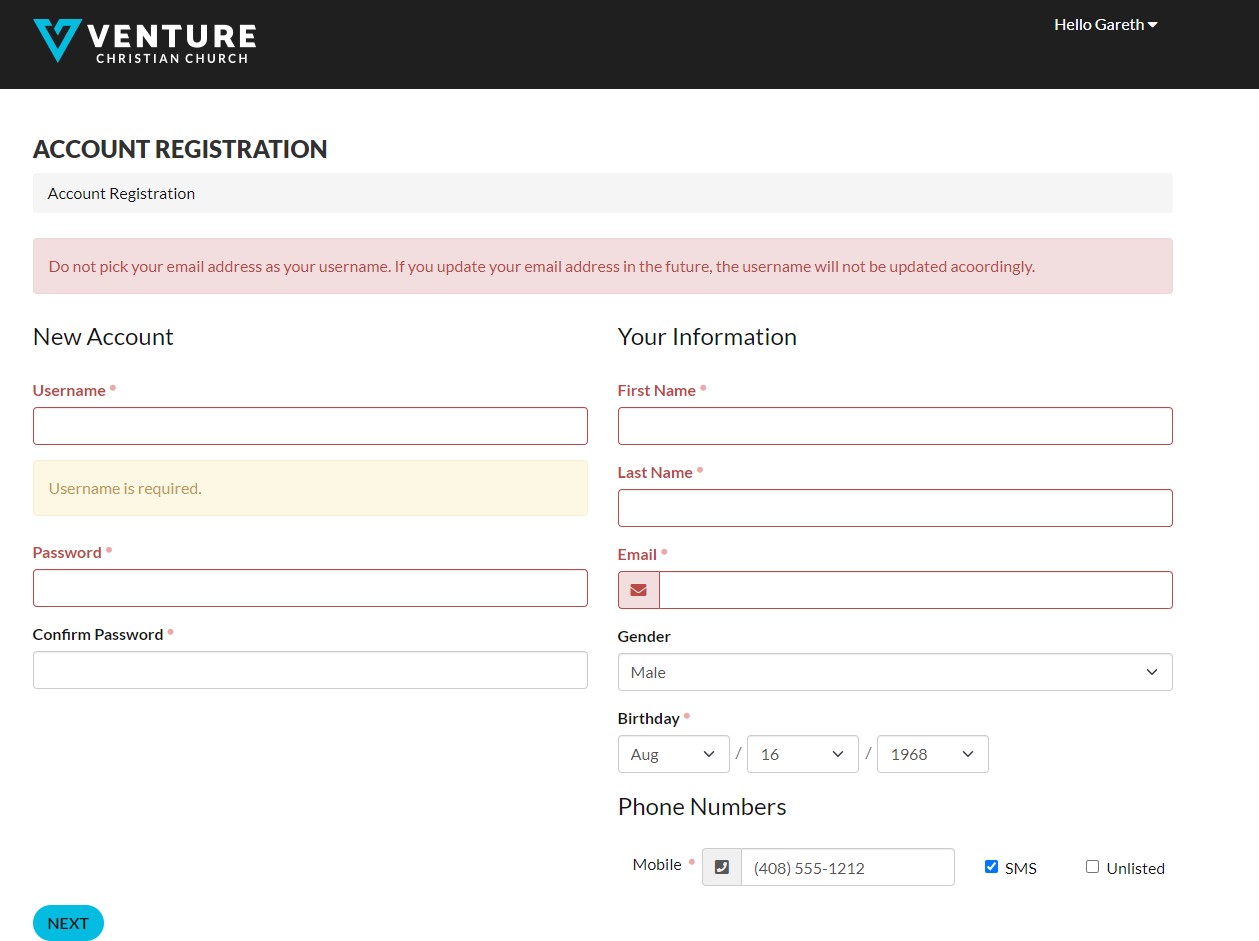 Note that you need to complete all compulsory fields, including the address and that there are password restrictions.
Also, keep in mind as you select a username, it’s best NOT to use your email address. This will save you confusion if in the future you need to change the email address associated with your account.
 - Click “Next” to continue. You’ll get a page indicating that you’ve successfully created your account. Click “Continue” to proceed.

- And you’ll be logged into your account.
A Video Tutorial is available:
Venture Connect - Login
Updating your Profile
Keeping your profile up-to-date, especially the contact information, is quite useful , especially if ministry staff need to contact you.
You can also update your family/household information to help us better meet your needs. Having up-to-date family information is especially helpful in streamlining the children's checkin process.
Steps for updating your profile
- Login to Venture Connect
- Your details will be displayed after you've logged in. Click on the "Update" button.
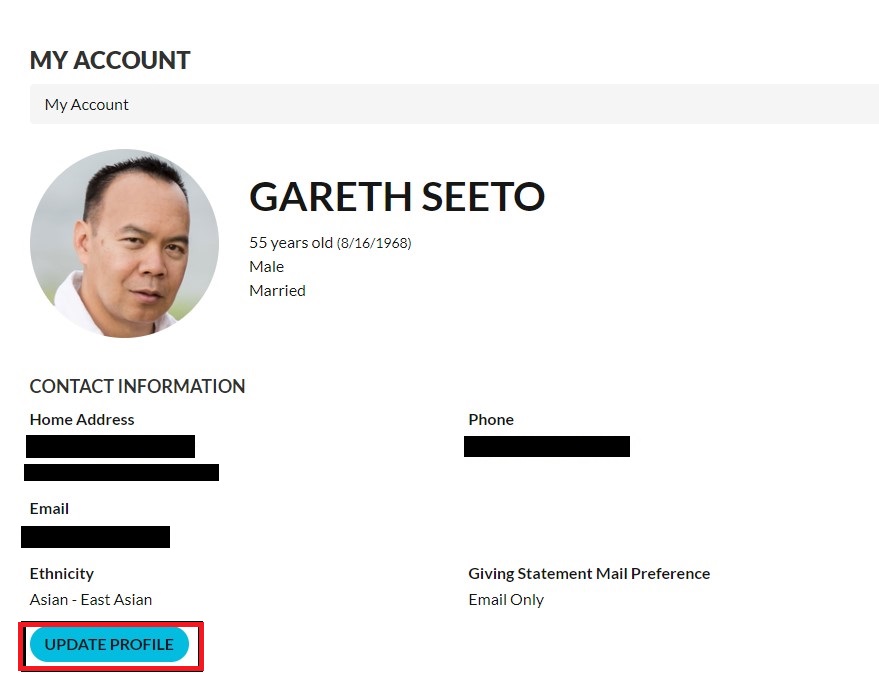
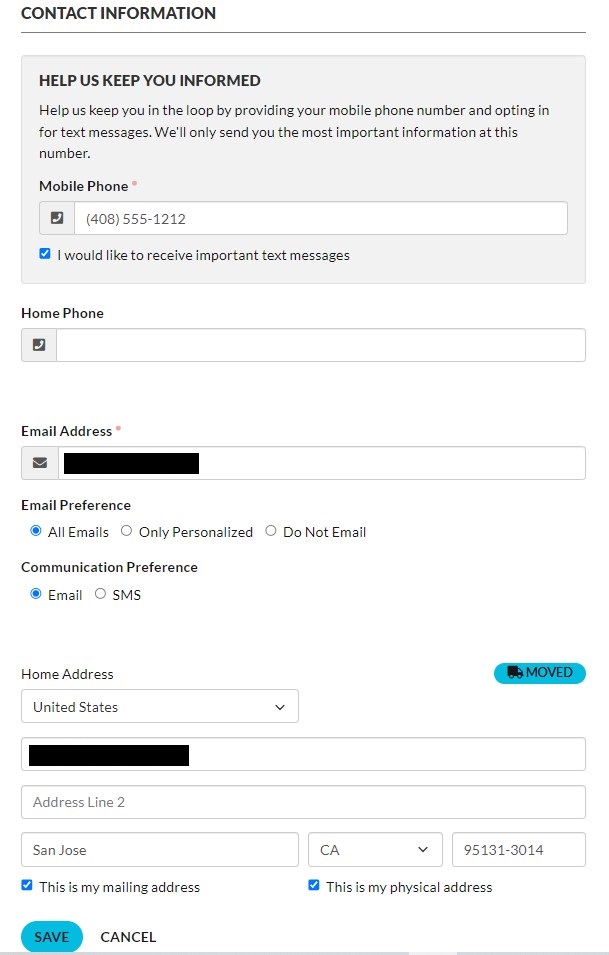
- Make any necessary edits to your information. there are a number of sections that can be edited: personal, additional information, contact information. The more complete the information, the more helpful to us.
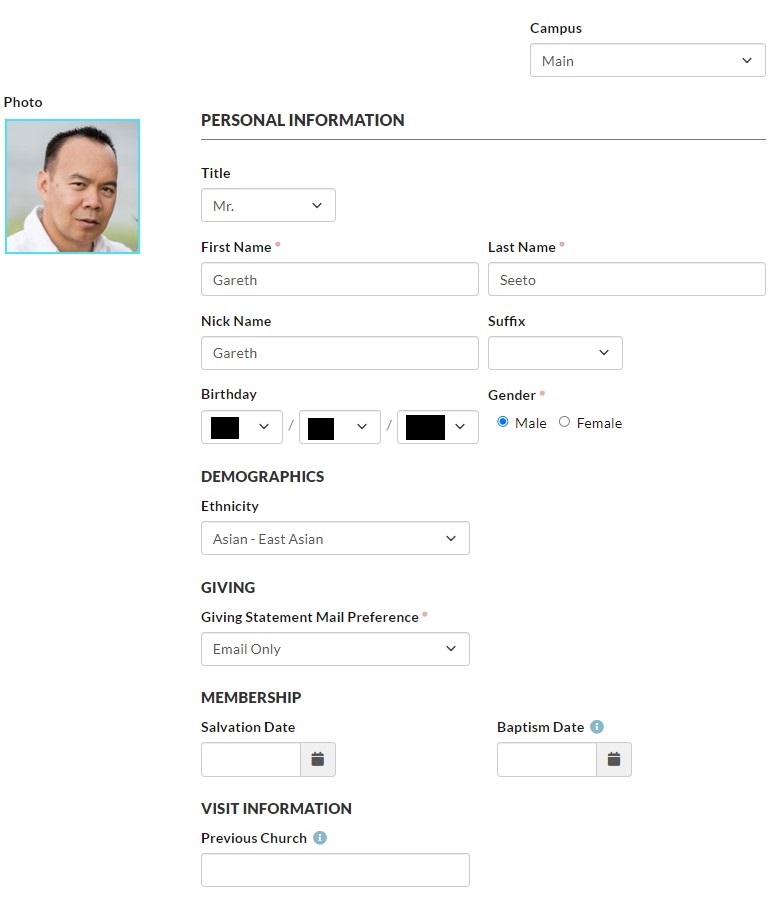
- After you've made your changes, scroll to the bottom of the page and click "Save".
Steps for updating your family/household information
- Login to Venture Connect
- Scroll down below your details and you'll find the Family/Household section.
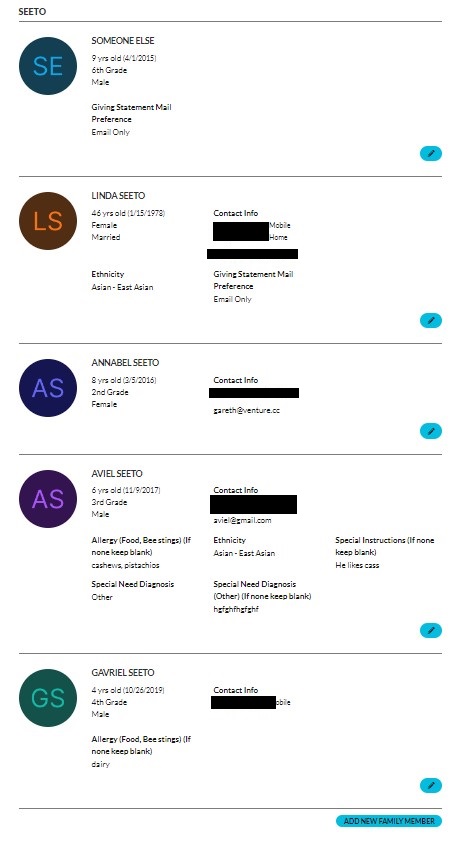
- Your household members should be displayed. To the right of their information is an "edit icon" button. Click on this button if you need to update any of that family member's details.
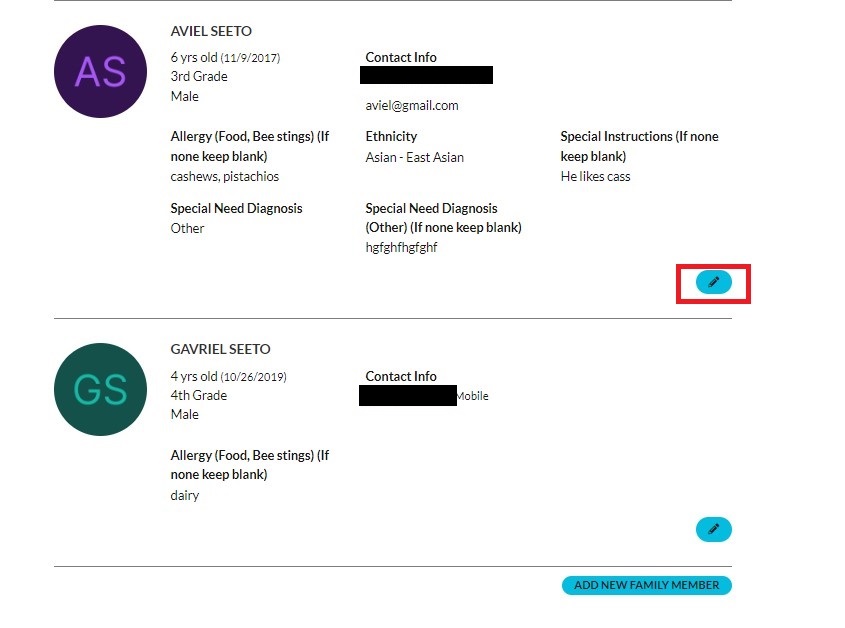
- Edit their information accordingly and save.
- If you need to add an additional family member to your household, scroll to the bottom of the page and click on the "Add New Family Member" button.
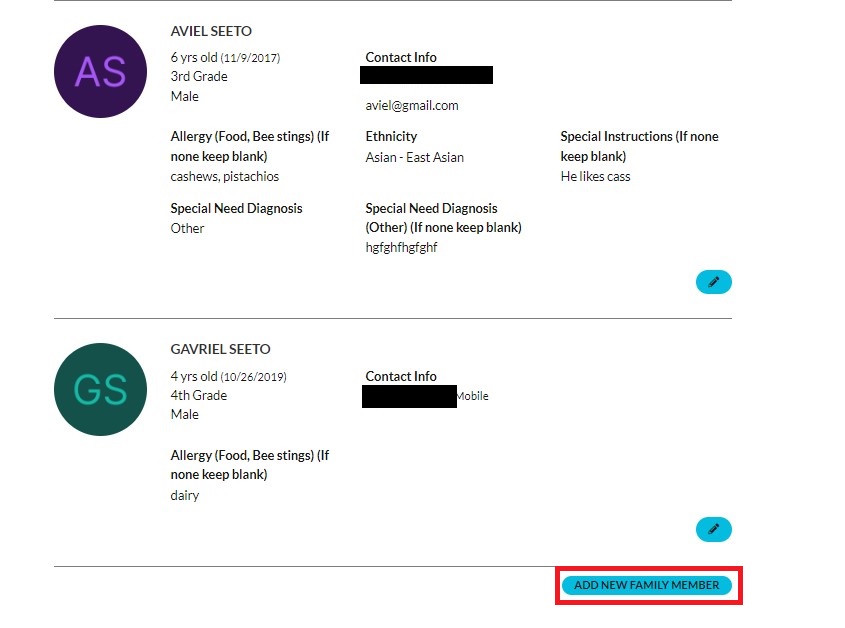
- Fill in the appropriate information and save.
Group Leader Tasks
If you are a leader or co-leader of any groups (for example, a Life Group), then Venture Connect allows you to manage your Group and group members directly from the portal.
The following sections below describe the many functions available to you as a group leader.
Adding people to your group
People can learn about your group in many different ways. Through Group Finder, word of mouth, or they may even be a friend that you invite personally. Either way, there will be times (hopefully often) when you find yourself needing to add a person to your group. Instructions on how to do so are provided below, along with a video tutorial. Also provided below is an explanation of how people might join your group through Group Finder, as this is a special case that merits its own explanation.
Steps for Adding People to your group:
- Log in to Venture Connect.
- The list of Groups that you lead or co-lead are displayed in the right column under the Groups Section.
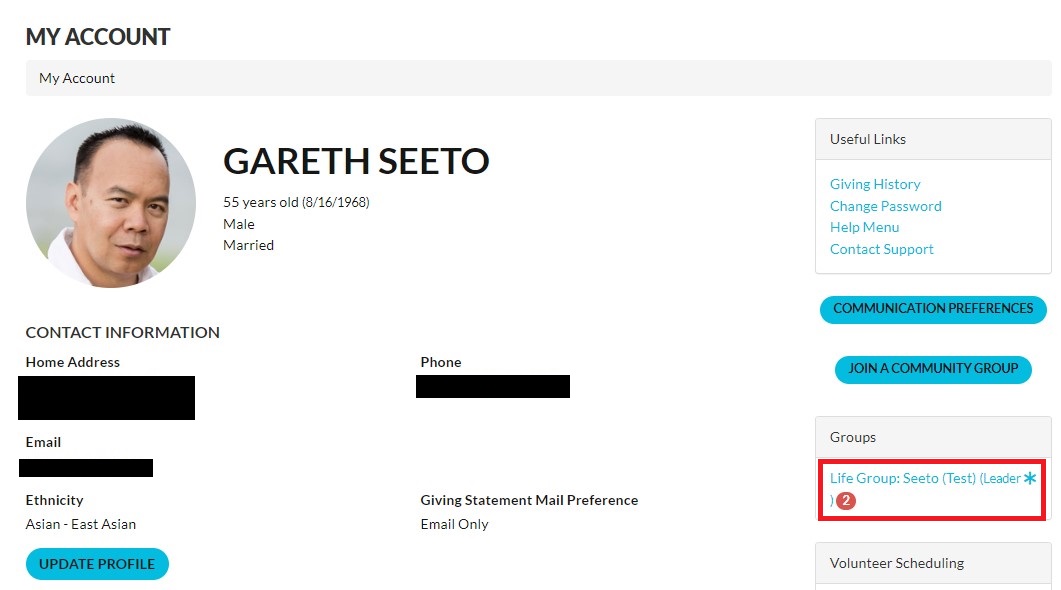
- Click the group that you want to add the person to.
- You'll be directed to the Group page.
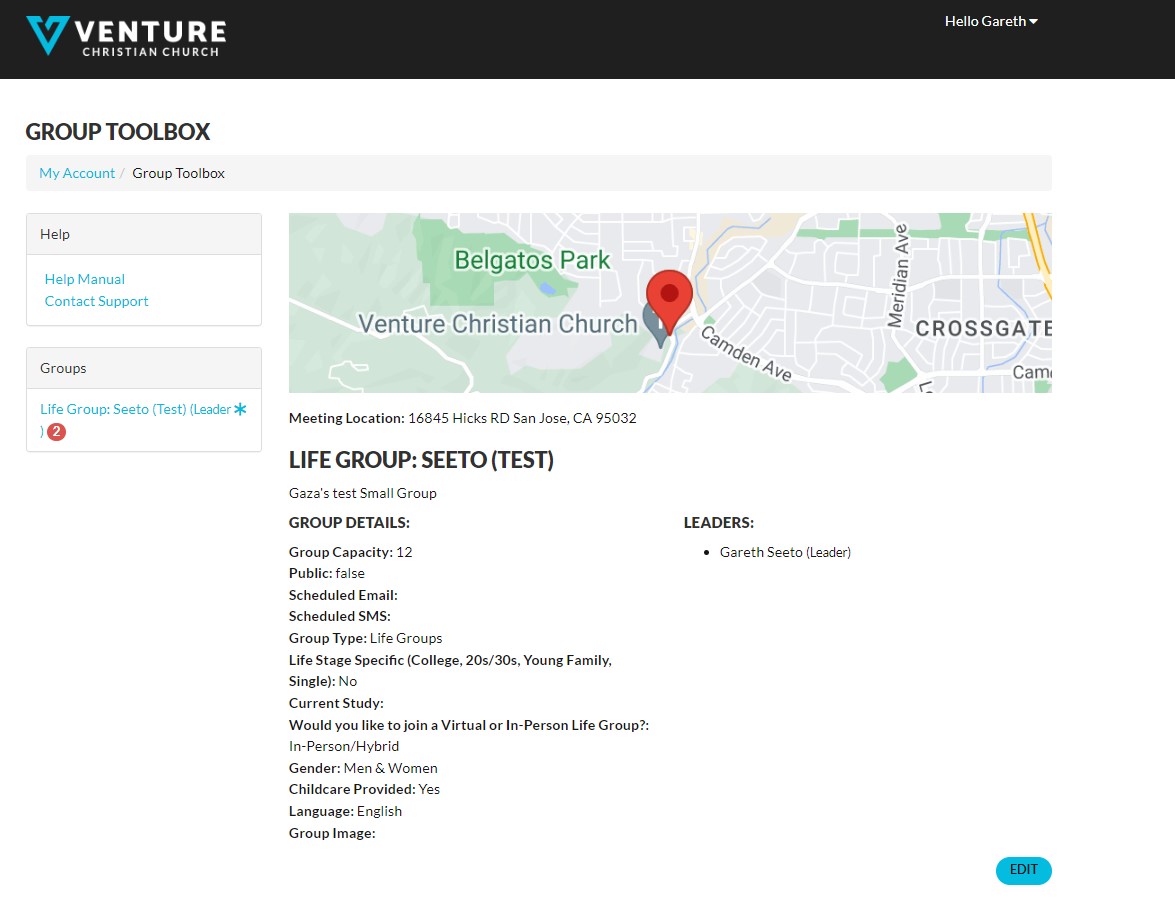
- Scroll to the bottom of the page, where the group members are listed. Click on the "Add Member" button at the bottom of the page.
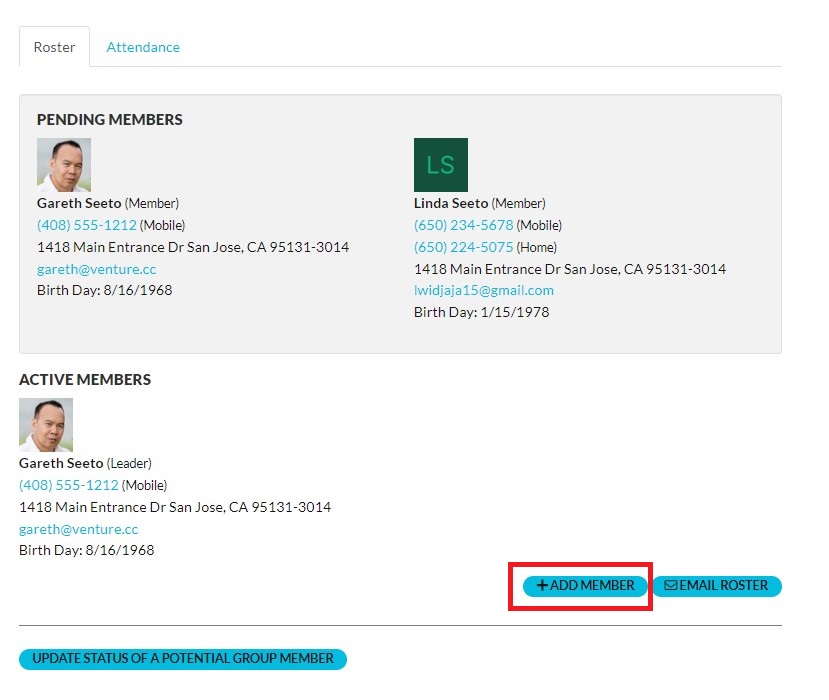
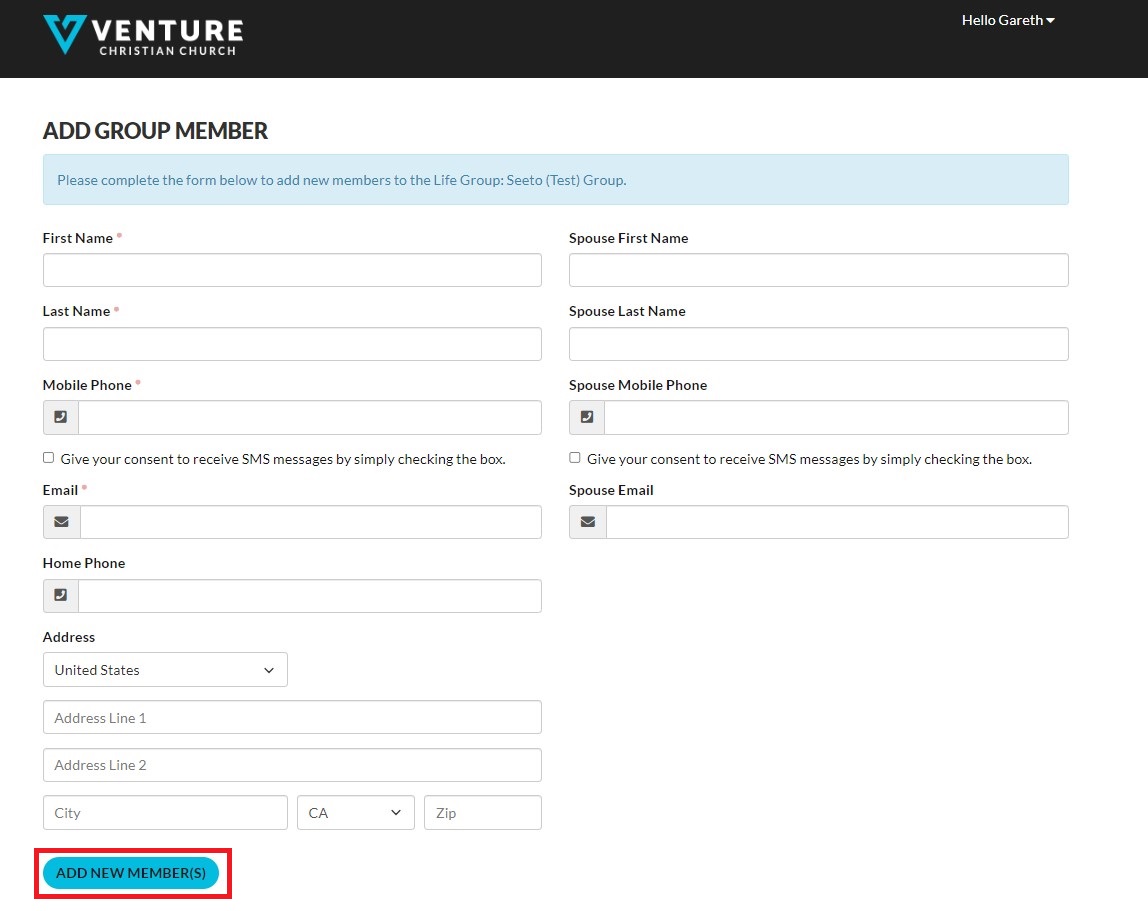
- Fill out the fields to provide sufficient information about the user, and click on the "Add New Member" button at the bottom.
Steps for adding people connected via Group Finder
The reason the process is different for people who arrive at your group via Group Finder is because Group Finder automatically adds them to your group for you, but sets their status to pending. After they've attended for a while and make the decision to stay with your group, then you need to change their status to Active in order to make them a proper group member that you can take attendance on.
- Log in to Venture Connect.
- The list of Groups that you lead or co-lead are displayed in the right column under the Groups Section.

- Click the group that you want to officially add the group finder person to.
- You'll be directed to the Group Page.

- Scroll past the group details. You'll see a section labelled "Pending Members". The person who joined your group via Group Finder will be listed there.
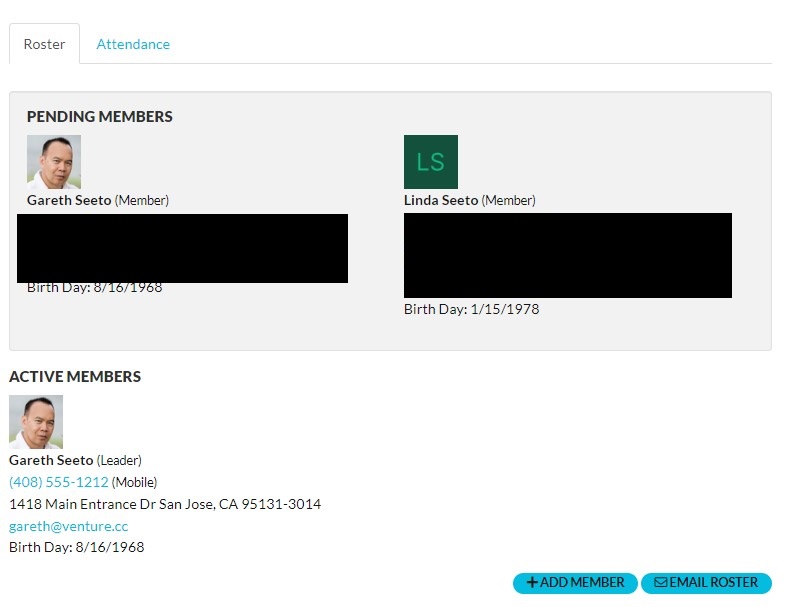
- Mouse over the person who you wish to change to a regular member. A pop up icon should appear allowing you to either delete or edit. Select to edit.
- You'll be prompted to change the status and role.
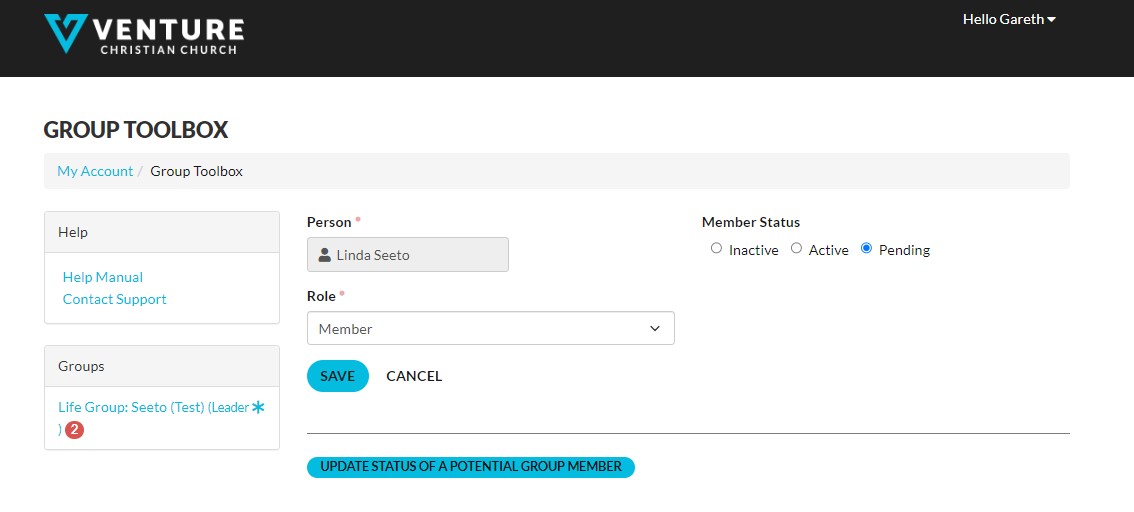
- Click on "Save"
- The person should now be added to the Active Members list.
Steps for removing people connected via Group Finder
As stated earlier, Group Finder automatically adds people to your group for you, but sets their status to pending. After they've attended for a while they may make the decision to not attend your group. At this point you should remove them from your member list. The steps to do so are as follows:
- Log in to Venture Connect.
- The list of Groups that you lead or co-lead are displayed in the right column under the Groups Section.

- Click the group that you want to officially add the group finder person to.
- You'll be directed to the Group Page.

- Scroll past the group details. You'll see a section labelled "Pending Members". The person who joined your group via Group Finder will be listed there.

- Mouse over the person who you wish to change to a regular member. A pop up icon should appear allowing you to either delete or edit. Select to Delete.
- You'll be prompted to confirm this deletion. Select Yes.
- The person will now be removed from your group.
Updating your Group's Information
As a group leader you may need to occasionally update your group's information. For example, you might change the day or time that you meet, or even the location.
Rather than forwarding the new information to a ministry leader to update for you, by logging in to the Venture Connect portal you can do it yourself!
- Log in to the Venture portal
- Any groups that you're the leader of will be displayed on the right. Select the link for the group whose information you wish to update.
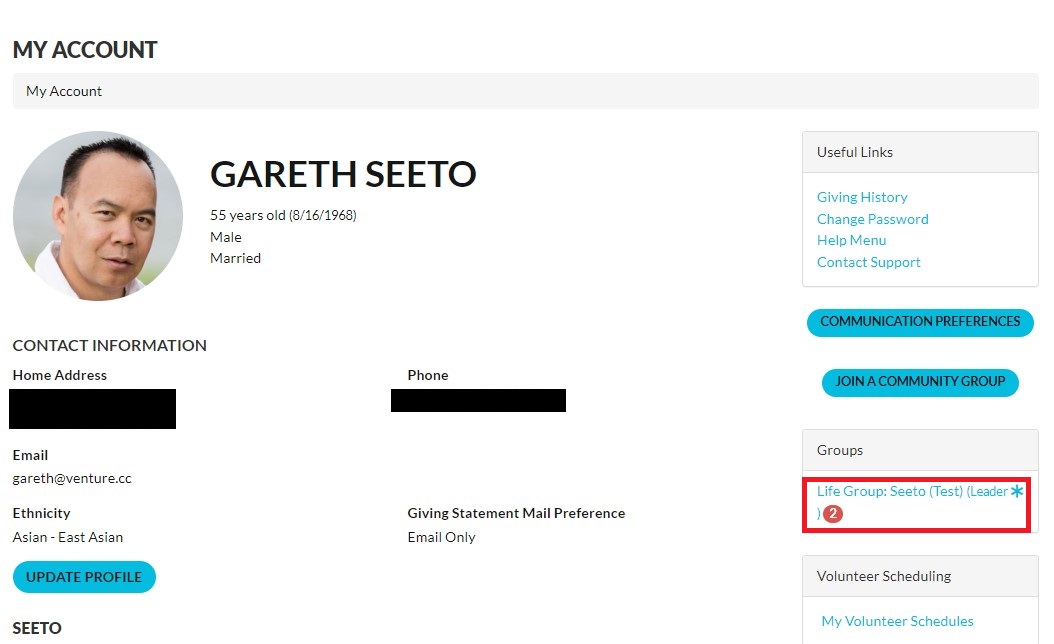
- Once the group page is displayed, click on the "edit" button.
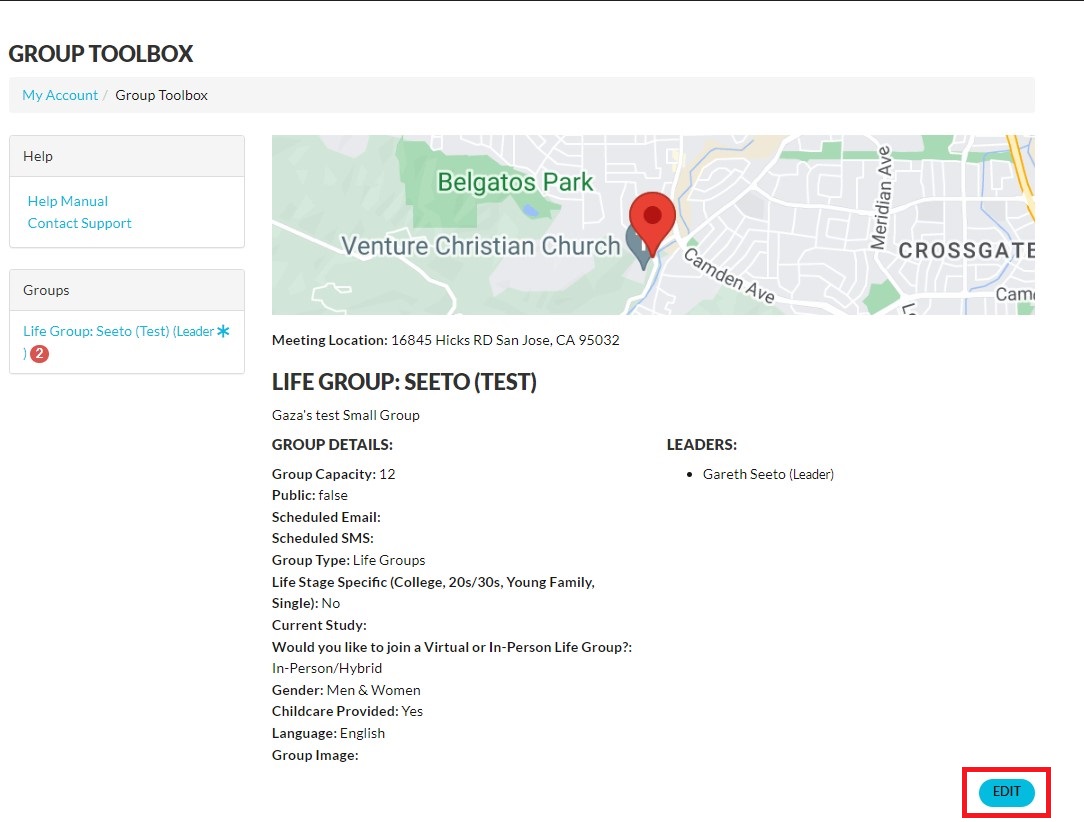
- You can see that you then have the ability to modify a number of group details: group name, description, day and time, group capacity, etc. You even have the ability to add an image that best describes your group. It's highly recommended that you put a catchy (but accurate) description, and an appealing image, as these will be displayed on GroupFinder. The more appealing it is on GroupFinder, the more likely you are to attract people to your group!
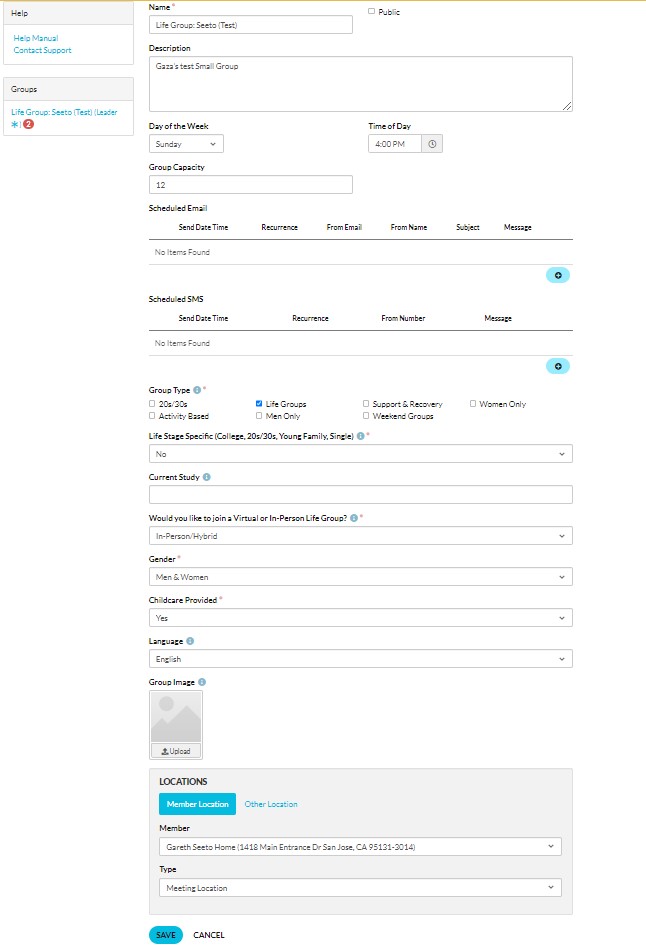
- Once you've finished with your updates, click on the "Save" button at the bottom of the page.
Communicating with your Group Members
There will be occasions when you need to communicate with all your group members. The steps to do so are as follows:
- Log in to the Venture portal
- Any groups that you're the leader of will be displayed on the right. Select the link for the group whose information you wish to update.

- Once the group page is displayed, scroll to the bottom of the page and click on the "email roster" button.
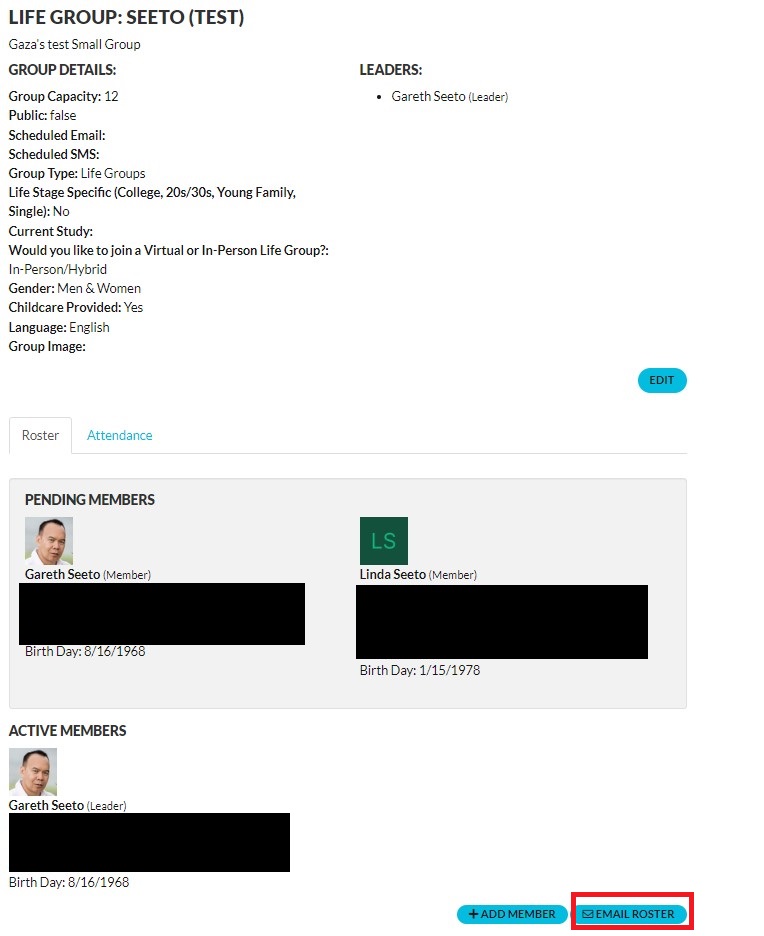
- A communications page will pop up allowing you to specify subject and message of an email. At the top of the page, by default, all members (active and pending) will be displayed as recipients of this email. You can selectively remove individuals before sending your email communication.
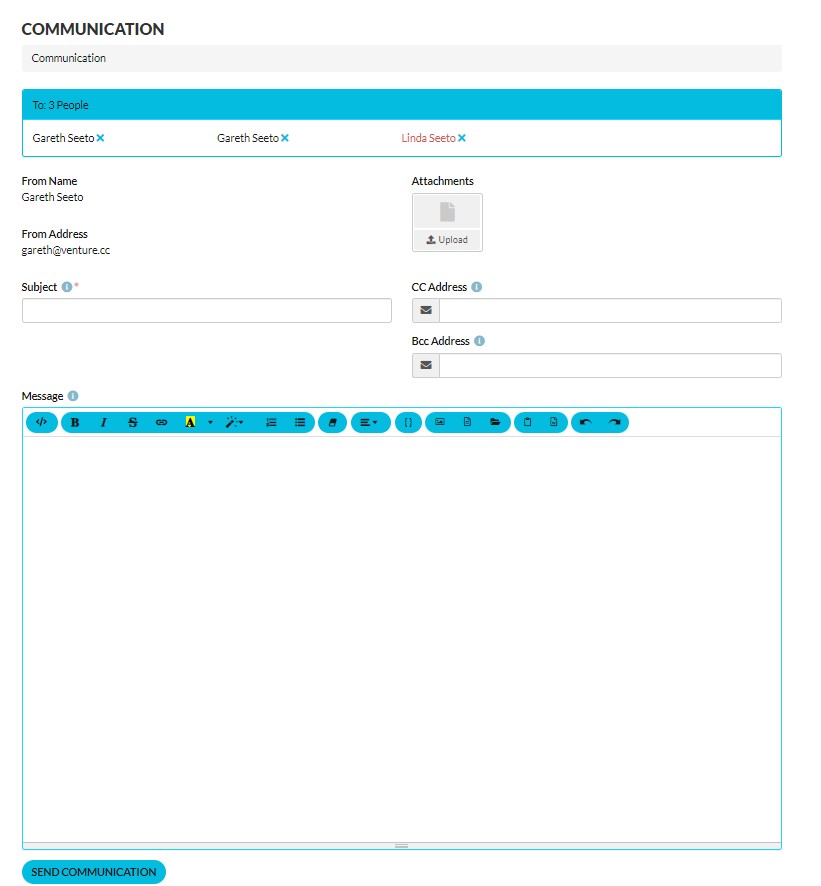
- Once you've completed entering your message, click on the "Send Communication" button at the bottom of the page.
- And the communication will be queued for sending.
Taking Group Attendance
It's important that you take attendance on a weekly basis, as it will give us a better idea on how to help you manage your group.
Typically you'll receive a weekly reminder to take attendance via email. That email will contain a link that will take you directly to the page where you can take attendance, simplifying the task for you.
However, it is possible to access the same page and to take attendance at any time, through the Venture Connect Portal.
Both approaches to taking group attendance have been listed below.
Option 1 - Taking Group Attendance (Via attendance reminder email link) Tutorial
Option 1 - Steps to taking Group Attendance Via Email Link
- Open the email reminder that was sent to you.
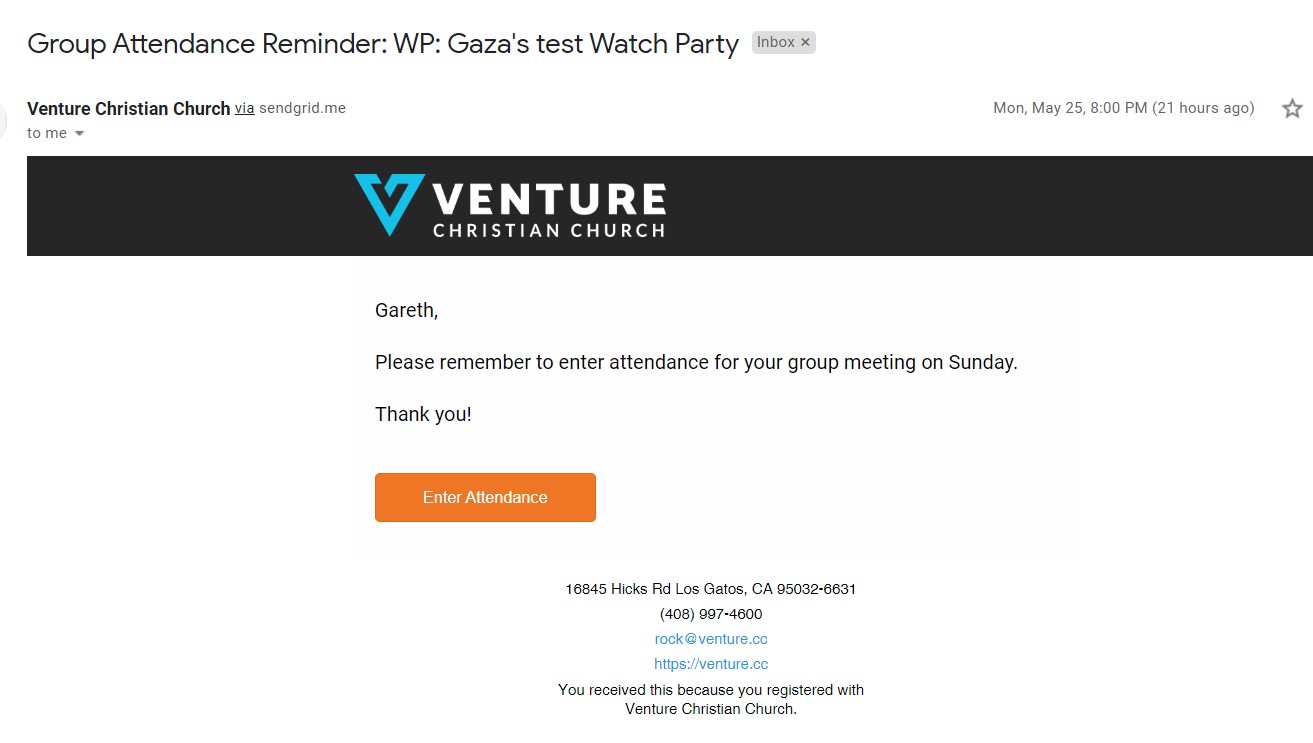
- Click on the "Enter Attendance" link at the bottom of the email.
- You'll be directed to a page that allows you to take attendance for your group, for the date in question.
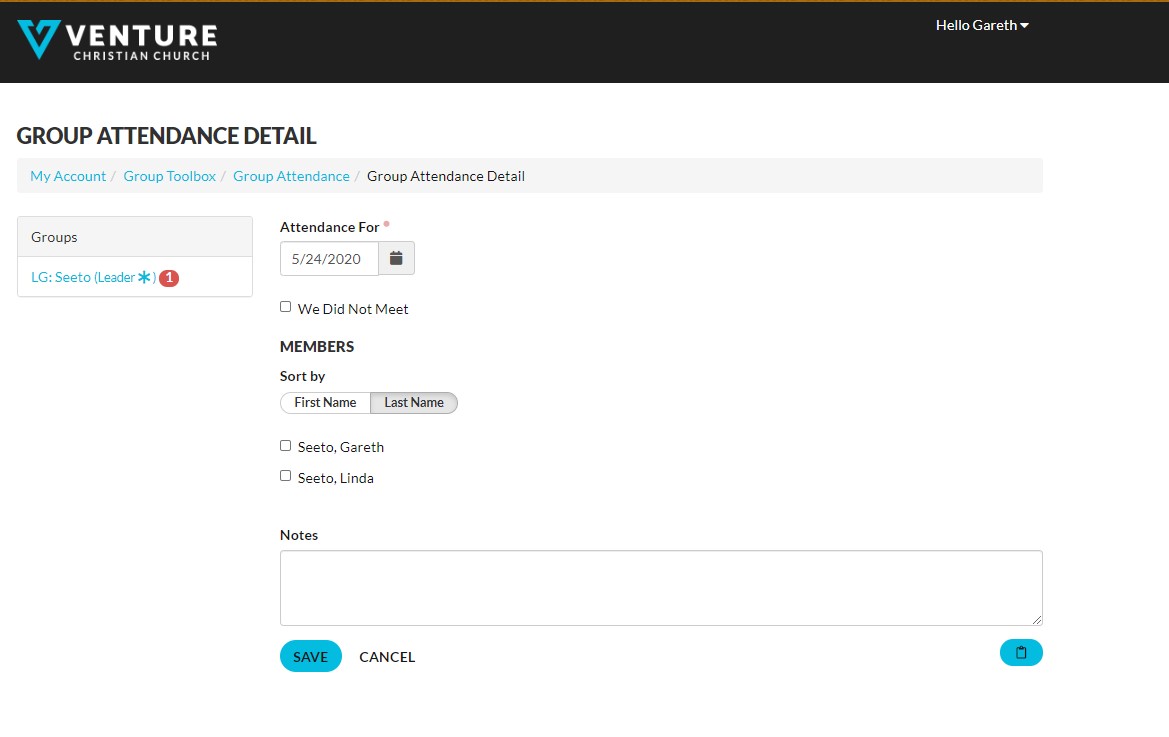
- Indicate all who attended by clicking the checkbox besides their name and click save when done.
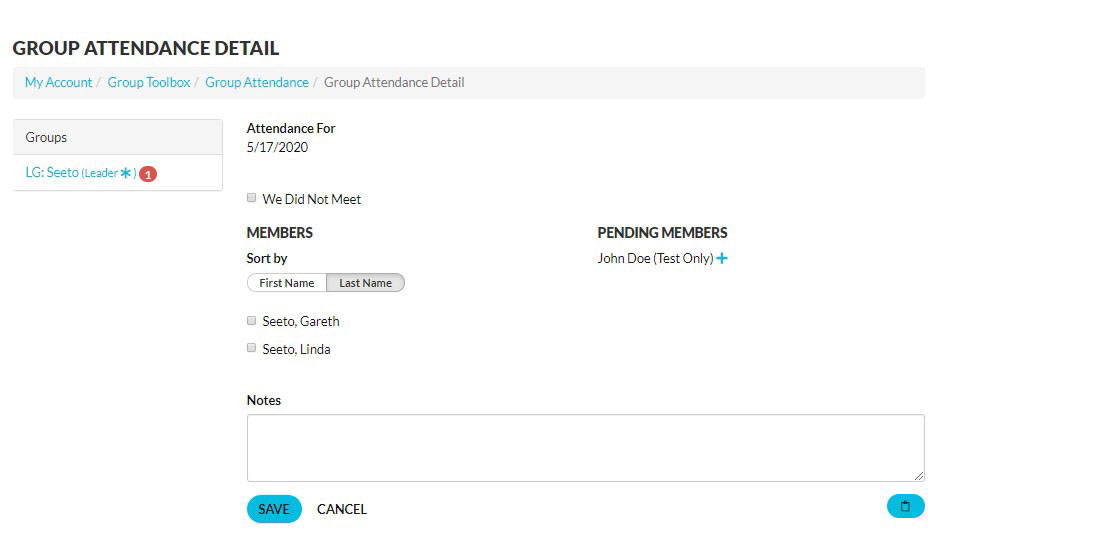
Option 2 - Taking Group Attendance (Manually) Tutorial
Option 2 - Steps to taking Group Attendance Manually
- Log in to the Venture portal
- Any groups that you're the leader of will be displayed on the right. Select the link for the Group whose information you wish to update.
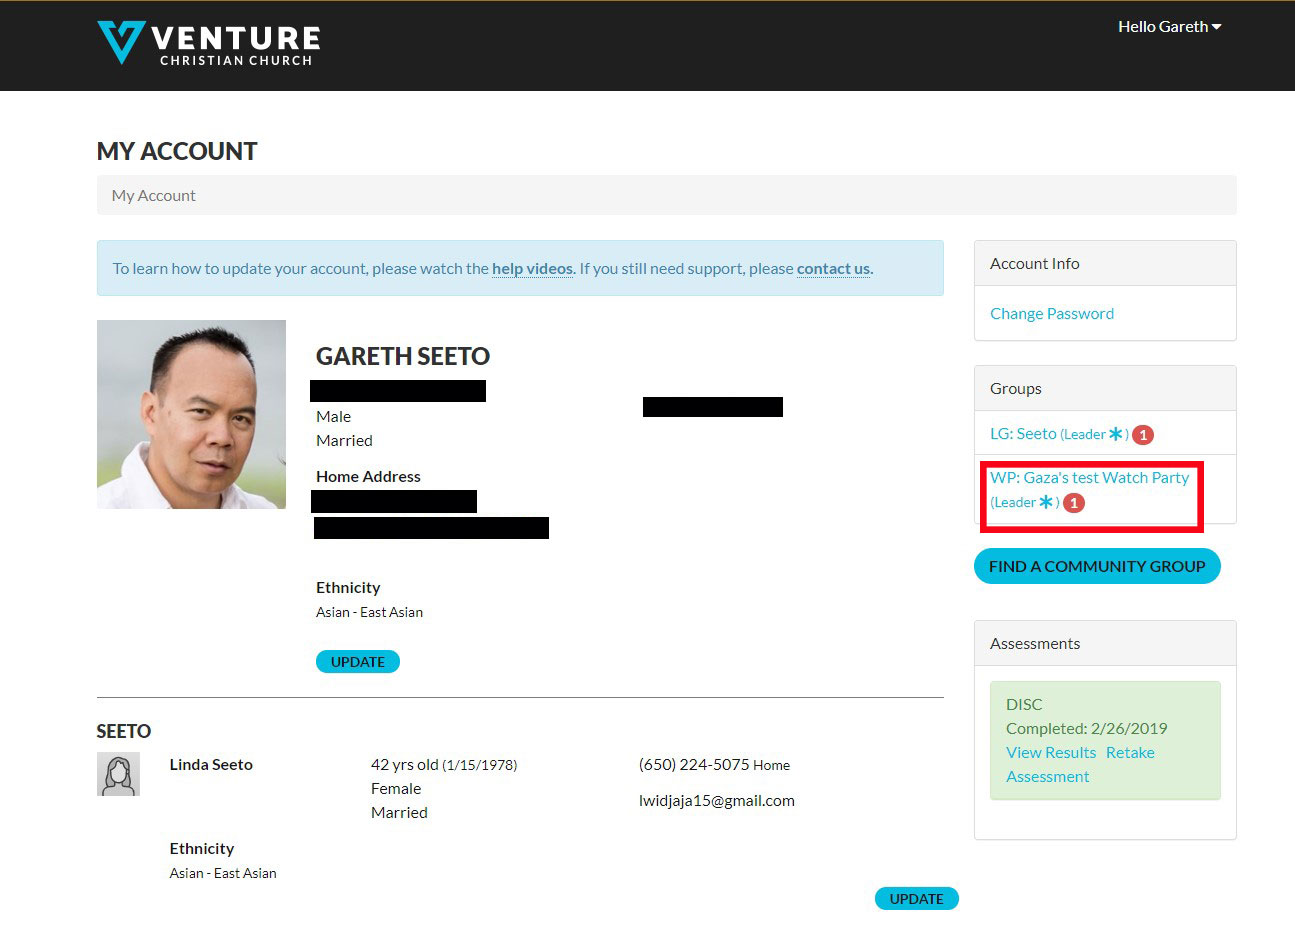
- Once the Group page is displayed, scroll to the bottom of the page and click on the "Attendance" tab.
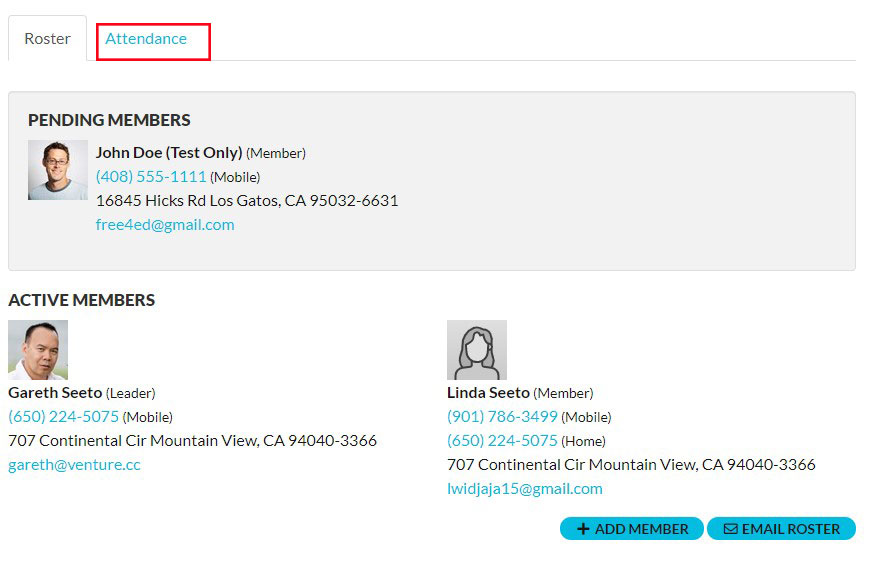
- A table of attendance dates will be displayed, based off the Day/Time of your Group. In order to take the attendance for a certain date, click on the "Enter Attendance" icon on the far right of the respective row.
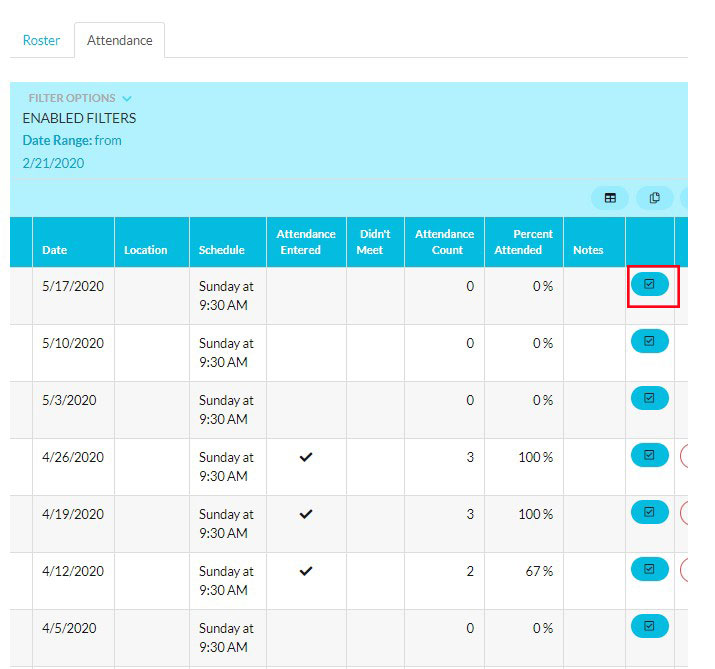
- Indicate all who attended by clicking the checkbox besides their name and click save when done.

Additional Video Tutorials
Update Person Profile
Set Up and Update Group
MY VOLUNTEERING SCHEDULES
If you serve in a volunteer team, you can view your scheduled times, respond to any serving requests, and set your preferences to better assist your team leader in scheduling you to slots that are best suited to you.
To get to MY VOLUNTEERSING SCHEDULES, first log in to Venture Connect. If you serve in a group that is utilizing our Group Scheduling system, you should see a link to your Volunteering Schedules in the right side navigation, under a tiled section named "Volunteer Scheduler".

Once you've clicked on the "My Volunteering Schedules" link you're taken to the Volunteering Schedules page with two tabs:
My Schedule

The "My Schedule" tab has two sections:
- Pending Confirmations
- Upcoming Schedules
Pending Confirmations
If your serving teams group leader has assigned you to a serving slot, then the details of that assignment will be displayed here, and you're given the option of accepting or declining the invitation to serve.
To accept the request to serve, click on the "Attending" button.
To decline the request to serve, click on the "Decline" button.
In both situations the group leader will be notified and can respond accordingly.
Upcoming Schedules
Any serving requests that you have accepted will be displayed under the "Unpoming Schedules" section. You'll also be sent reminders via email prior to the serving date.
Of course, there are going to be instances when you've already accepted a serving opportunity, but circumstances arise and you find yourself unable to fulfill that role. In those instances, it's possible to cancel the confirmation by clicking on the "Cancel Confirmation" button.
The group loeader will then be notified and can attempt to fill that slot with someone else.
If ever you need to cancel, keep in mind that the sooner you let the leader know, the better, as it will give them more time to find a replacement.
Preferences

In order to better assist the team leader in setting up a serving schedule, you can let them know what your serving preferences are. That way, they can assign you to serving slots that would most likely suit you.
You can indicate how regularly you'd like reminders sent by specifying in the "Send Reminders" dropdown.
You can indicate how regualrly you'd like to serve (Every Week, Every Other Week, 1st and 3rd Week, 2nd and 4th Week), and when this scheduling should start.
You can indicate WHERE and WHEN you'd like to serve by indicating the Time and Location you'd like to serve on the day, by specifying your preferences under the "Assignment" section.
It's possible to add as many preferred assignments as you like.
Finally, on the right side, in addition to the scheduling preferences, you can also specify Blackout Dates.
For example, if you know you're going on holidays, you can indicate your blackout dates so the team leader knows to not assign you during those dates.
With all this information at their fingertips, the team leader can now make the most informed choices when creating the team schedule.
SUBMIT A REQUEST
Can't find what you'e looking for and still need help?
You can submit a support request and we'll get back to you as soon as we can.
Return to the Account Login page.